Monday, September 22, 2008

Gauntlets!

I moved last month from Dela-fuckingboring-ware to Amherst, Massachusetts, where I now attend college. Yay college! (it's a lot of fun, I highly recommend it.) To make a little extra cash on the side I've been whoring my knitting skills out to those who just want something fun. And I've got some wacky requests, including two stuffed daleks. (the pattern is actually easy to follow -- you can find it here). But the point of all of this is that my friend Shannon and I went into Faces, this great little shop in Northampton, where we saw these gauntlets. Yes, I know manufacturing makes all knitted stuff a shit ton more, but I basically turned to her and said "I can make this for you for less." So I did. Here's my pattern.

Shannon's Gauntlets
required skills: working in the round on double-pointed needles, backwards loop cast on (you can use regular cast on, but it won't be as elastic and may be harder to put on)

Materials:
Worsted weight Yarn (Shannon picked out Plymouth's Encore Colorspun, which looks pretty and knits up nicely, but you might want to try something with a little more wool so it's warmer. I used about half the ball.)
set of 5 double pointed needles, US size 4
Tapestry needle

Using backwards loop cast on, CO 44 sts. Divide the stitches so you have 7 stitches on the first needle, 15 on the second, 15 on the third, and 7 on the fourth. Join, taking care not to twist the stitches (as always).
Round 1: 3x2 rib to last 4 sts, k2, p2.
Continue in this pattern until the gauntlet is 6.25 inches long (or as long as you want the sleeve).
Next round: k all sts. Repeat this round 13 times for a total of 14 rounds in stockinette st.
Using the first and fourth needles ONLY, work in the round in stockinette stitch for 10 rounds (14 sts per round). Bind off and cut yarn, leaving a long tail.
Do the same thing for the second and third needles (30 sts per round). You don't need to leave a long tail.

You'll notice you have a big hole between the thumb and the fingers. Here's how to fix it:
Using the long tail from the thumb hole, weave the end down and around the inside of the thumb hole until you are at the offending hole in between. (you might want to turn it inside out so you can weave in better). Stitch through all of the stitches around the hole, cinch shut, and then weave in any other adjustments. Mine isn't totally scientific, I just played with it until the hole was shut and everything looked OK.

Weave in all other ends.

Repeat these directions if you want a pair and voila! You just made gauntlets. Congratulations.

Sunday, July 27, 2008

Two posts in one month? No way!

Yeah way. It's exciting, I know. On one of my other favorite websites (that would be Murmurs.com, best official unofficial R.E.M. fansite ever) there is a mix CD exchange going on. I wanted to make mine extra special, so I put labels on my two CDs and created a booklet. Then I thought, It's still missing something...

And then a few nights ago I thought of a knitted CD case. And the mini-sack was born.

DPNs (double-pointed needles) are definitely a necessity for this pattern. Of course, I hate using DPNs, so I switched to circulars as soon as I was able. If you have a 12" circular needle, you might not need DPNs at all. But I recommend having them, just in case.

My mini-sack comfortably held two CDs and a 24-page CD-size booklet.

The Mini-Sack
required skills: using double-pointed needles, using circular needles, knitting in the round, crochet (chain stitch)

materials:
worsted weight yarn (scrap yarn would probably be ideal for this project, since you really don't need a whole lot. I'll estimate... 80 yd? You'll probably have some left over.)
16" circular needle, size 6
3 DPNs, size 6
straight needles, size 6 (optional)
crochet hook, size G or smaller
Tapestry needle OR needle and thread (you may prefer going the needle and thread route, since the opening for your drawstring is so small)
Safety pin

On your circular needle (or straight needles, if you prefer), CO 25 sts. Do not join.
Knit two rows in St st.
Row 3 (RS): while knitting, switch to DPNs. Instead of turning your work, pick up and k 2 sts on adjacent side, and use a new DPN to pick up and k 25 sts on CO side and 2 sts on remaining side. You should now have 54 sts, with 27 sts on each needle.
K in St st in the round for 10-12 rounds (k EVERY round).
At this point, if you prefer, you can switch to circular needles.
Continue to k until your sack is 5.5 inches long.
K one round, but do not join. Instead, work back and forth on the circular needle (or DPNs, if you're brave) for 1 inch in St st (alternate k and p). End on WS. BO.
Fold your top lip inside the sack down to where the notch begins. Use backstitch to sew the tube into place.
With your crochet hook (using another color of yarn if you so choose), make a chain 15" long.
Using a safety pin, pull the chain through your tube until you have an even amount hanging from each end.

THAT'S IT!

Thursday, July 3, 2008

Tucker's Sack of Chaos


So I was at my friend Emily's summer party a few weeks ago, enjoying life, when our friend Tucker comes up to me and asks, "hey, you knit, right?" I was rather surprised by the question, because I did knit, but I was in the house of a knitter far more experienced and talented than myself (and I'm not just saying that). Then he asked me to make him a bag with a symbol on it, and that he'd send me the symbol later.

And then I got it. Hot damn.

Moral of the story: never agree to a project until you know what the project is.

I want ten dollars and a week of my life back. (And Tucker, if you ever read this, I mean that with all the love in the world, but DAMN was that image complicated!)

TUCKER'S SACK OF CHAOS (dimensions: 17" wide by 15.5" long
 laid flat; base is 13" wide and 3.25" deep)

Required skills:
using circular needles, knitting in the round, changing colors, crochet (chain stitch)

Gauge: 11 sts and 16 rows = 2" on size 5 needles

Materials:
Caron Simply Soft Heather in Charcoal (MC): 2 skeins
Caron Simply Soft Brites! in Lemonade (CC): 1/4 skein
24" circular needles, size 5 OR size to obtain gauge
Crochet hook, size G
Place marker

With MC, cast on 80 sts.
Knit 21 rows in stockinette. Do not join edges.
at the end of the 21st row, do not turn work. Pick up and k 20 sts on adjacent side, 80 sts on cast-on end and 20 sts on the last side. (It may get a little tight here)
Place marker and work in the round (stockinette stitch) for 7 rounds. (If you want your bag to be longer, add rounds here.)
8th round: begin following the pattern, working in CC as necessary. Carry CC loosely behind the work when not in use.
At the end of the pattern, k 11 rounds.
k 1 round, but instead of joining, work back and forth in stockinette stitch for 7 more rows (8 rows total) to create a notch.
Bind off.
Make a tube for the drawstring by sewing the bound-off end to the inside of the work, leaving 1" long opening.

Drawstring: Using CC and crochet hook, create a chain 40" long. Fasten off. Pull the drawstring through the tube. (I recommend tying one end to a safety pin and pulling the pin through.)

Enjoy!

Wednesday, June 25, 2008

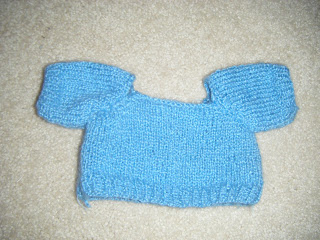
Basic Teddy Bear Sweater

This is my first self-made pattern that I created with a bit of sportweight scrap yarn. I lost the label long ago, but it's a basic acrylic no-name yarn that my mother gave me a few years ago. (She doesn't knit and doesn't really understand yarn quality and whatnot). Needless to say, I felt I had to make something out of it. Since the ball was so little, why not make little clothing?

There is no neckband because I wanted to keep this basic (and because I suck at making them). If you want to add one, I recommend using a smaller circular needle (size 1) and knitting 4 rounds in k1, p1 rib.

REQUIRED SKILLS: working in rib, working decreases

YOU WILL NEED:
Size 2 needles
Sportweight yarn (one ball will be more than enough).

GAUGE: 6 sts/10 rows in St st = 1 inch

FRONT:
CO 42 sts.
Work in k1, p1 rib for 6 rows.
Row 7 (RS): Work in St st for 18 rows; end on WS.
Row 25 (RS): k1, k2tog, k to last 3 stitches, k2tog, k1
Row 26: p1, p2tog, p to last 3 stitches, p2tog, p1. Repeat these two rows 5 times more --
18 sts, end on WS. Bind off.

BACK: work as for front.

SLEEVES:
CO 36 sts.
Work in k1, p1 rib for 5 rows.
Row 6 (RS): Work in St st for 12 rows, end on WS.
Row 18 (RS): k1, k2tog, k to last 3 stitches, k2tog, k1
Row 19: p1, p2tog, p to last 3 stitches, p2tog, p1. Repeat these two rows 5 times more --
19 sts, end on WS. Bind off.

Sew the sleeves together, attach to main body. Sew down the sides and you're done!